

Charming Lady Siggy
This tutorial
was created and put online on October 14, 2002.
Please do not copy or place this tutorial or any of the graphics on any site, or
send it throught email.
Groups can freely link to it.
I don't have the time to assist people in doing this tutorial, but if you have problems in downloading the supplies needed, please email me.
See other examples made by my testers, here
This project is to make a sigtag using charms. It's in two parts: the main image and the charms. You can use charms you have already tubed or make your own following my instructions.
This tutorial is rated
according to the FBNG's Skill Level Standard
For this tutorial you'll need:
- Paint Shop Pro, get it here
- This zip file containing tubes
- This gold pattern, save it, open in PSP and minimize:
Let's begin!
Remember to save often!
1) Open an image, 400 x 400, transparent background, add a new layer, floodfill it with black ( to see better, we'll delete this layer later)
2) Add a new layer, go to your tube tool, choose the lady tube you just downloaded, size 75, place the lady on the top part of your image
3) Highlight Layer 2, set your foreground to the gold pattern, size 100, angle 0, and your foreground to nul. Click on the preset shapes tool, choose ellipse, antialias and vector checked, line width 5, line type stroke, draw an ellipse about the same size of the tube.
Now we have to adapt it, so that the upper part of the circle is almost hidden by the lady, and the bottom part is visible and our charms can hang nicely from it. To do so, put your mouse on the bottom center handle and drag it to the bottom, then drag the ellipse to the right using the right center handle, and to the left using the left center handle. Put the ellipse in place using the center handle, click once on the image to apply. Layers/convert to raster. Go to effects/texture/sculpture/gold, use the default settings.
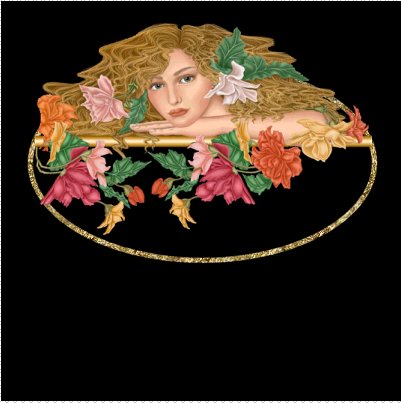
Here is your image so far:
Let's make your charms now! (click here)
PUTTING ALL THINGS TOGETHER
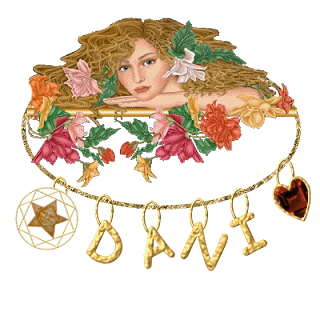
26) You should have already copied and pasted all charms on the main lady image, now you can order them as you wish:

27) Zoom once on the image to see better. We are going to delete part of the chain rings. Get your eraser tool, these settings: Round, size 4, Step 1, all the other settings 100.

28) Delete layer 2 (the black background). Then Layers/Merge visible. Image/Resize 80 percent. Export as a tube, or as a transparent gif.
YOU'RE DONE!
Thanks for trying my tutorial :)

Tutorial Copyright ©dani 2002